Web - 2026.5
API
External IDs For Flights/Legs/Quote Itinerary
Trip Status Update
Finance
Fee Condition Updates
Fee and expense rules are now much more flexible when you set them up under Settings → Quote. Instead of a small set of fixed options, you use the same kind of conditions you may already know from service task templates—so your quoting rules can match how your operation actually works.
Richer rules — Base fees on things like date ranges, distance or flight time (and similar range-style ideas), specific accounts, tail numbers, aircraft groups and models, airports, airport services, states, countries, geo groups, and more—using clear greater-than / less-than style logic where it applies.
Existing setup is preserved — If you already had start/end dates or min/max ranges on a fee, those were carried over into the new rule style so you do not lose configuration.
Clearer priority when several rates match — If more than one rate could apply, you can put the rates in the order you care about. The system uses that order to decide which rate wins, instead of relying on a fixed behind-the-scenes order you could not control.
Consistency across the product — Fee conditions and service task conditions are aligned, so similar concepts behave similarly and new condition types show up where they make sense for both.
You get more control, clearer behavior when multiple fees could apply, and less limitation on how fees are tied to trips, aircraft, airports, and dates—without having to re-enter everything from scratch if you were already using the older fields.
Multi-Currency Support
Configuration overview
You can run trips and financial figures in the customer's currency while keeping fee definitions and rates in the currencies you actually receive quotes or vendor costs in. Currency setup is split across System settings (your organization's anchor currency), the Currency Rates area (currencies and exchange rates), and Quotes configuration (how each fee's amounts are expressed).
Define currencies and which ones are allowed on trips — Configuration → Currency Rates → Currency Type (trip currency column).
Maintain exchange rates over time — Configuration → Currency Rates → Currency Exchange Rates (grid at the top of the tab).
Choose the currency used for fee definitions and tiered fee rates — Configuration → Quotes → fee configuration (fee and fee-rate Currency Type columns).
1. Set up currencies used on trips (Currency Type)
Under Currency Rates, open the Currency Type list. Each row is a currency your tenant can reference (for example U.S. dollar, euro, pound).
Add or edit the currencies you need, using clear names and standard codes where applicable so they are easy to recognize on trips, fees, and reports.
Use the Trip Currency flag on a currency type to mark which currencies may be selected on the trip itself. Only currencies marked as trip currencies appear in the trip's currency dropdown, so you can keep a full catalog for fees or rates while limiting what schedulers and sales pick for the trip.
2. Set the base currency (System)
On the System tab, set Base Currency to the currency you treat as your organization's primary reference (often your accounting or home-country currency).
The base currency is used as the default Currency 1 when you add a new exchange-rate row, so new rates are anchored consistently to that currency unless you change Currency 1 for a specific row.
3. Add and maintain exchange rates
On Currency Rates, use Currency Exchange Rates to record how amounts convert between pairs of currencies.
For each row you typically set:
Effective date — the date the rate applies from (when costing a trip, the system uses the most recent rate on or before the relevant date).
Currency 1 and Currency 2 — the two currencies in the pair.
Exchange rate 1 → 2 and Exchange rate 2 → 1 — the multipliers so the application can convert in either direction.
Tip: Keep effective dates aligned with how you update rates in real life (for example monthly or when your bank publishes a new table). If a conversion is needed for a trip date and no rate exists for that pair and date, converted amounts may not calculate as expected, so maintaining overlapping or sequential effective dates for the currencies you use reduces surprises.
4. Currency on fees (Quotes configuration)
Fee definitions and their rate tiers can carry their own Currency Type. That is where you declare whether a fee's unit cost, minimums, or rate lines are stored in the trip's currency, the base currency, or another currency (for example a vendor's local currency).
When a fee's currency differs from the trip's currency, the application converts amounts using your stored exchange rates and the trip's timing (for example estimated departure) so that trip totals and rollups stay in the trip currency.
5. How it works on a trip
On the trip record (trip data / general trip information), choose Currency from the list of trip currencies you configured. That choice drives how quotes, fee summaries, and related totals are labeled and aggregated for that trip.
Individual fees may still be defined in another currency; those amounts are converted into the trip currency for display and totals where the product applies conversion logic. Where a fee keeps an original rate in another currency, the fees experience can still surface that original amount and currency for context alongside the converted figures.
Together, base currency, currency types (with Trip Currency), exchange rates, and fee currencies give you a consistent path from vendor or contract rates in mixed currencies to a single, customer-facing currency on each trip.
General
Access Restrictions
- Roles answer "what can this user do?" (menus, actions, configuration).
- User Access answers "which organizations' records should appear for this user when the product filters by organization?"
- All Orgs - Organizations included for general org visibility (combined with the other columns where the product applies "All" scope).
- Account Orgs - Organizations used when loading or filtering account-related data.
- Aircraft Orgs - Organizations used when loading or filtering aircraft-related data.
- Person Orgs - Organizations used when loading or filtering person-related data (for example crew-oriented areas).
- Give each profile a clear name (for example by department, certificate, or region) so assigning users stays simple.
- Access names must be unique (the application enforces this when adding a profile).
- You cannot delete an access profile while any user is still assigned to it - remove it from users first, then delete the profile.
- Open System > Users.
- Edit the user.
- In the Access column, select one or more access profiles (multi-select).
- Save.
- Trips - trip lists and related filtering respect account, person, and aircraft organization scope from User Access.
- Quotes - quote filtering aligns with the same trip-style organization rules.
- Persons - person search and listings respect Person (and All) scope.
- Aircraft - aircraft search and listings respect Aircraft (and All) scope.
- Accounts - account-related listings respect Account (and All) scope.
- Expenses - expense views that filter by organization respect Aircraft (and All) scope.
- Schedule - schedule views that filter by organization respect Aircraft and Person scope (for example aircraft- and crew-oriented calendar content).
- Organizations - organization search can be limited to organizations (and related organization relationships) the user is allowed to see when User Access defines an organization list.
- Define profiles: System > User Access - name plus org lists per category.
- Assign to people: System > Users - Access column; multiple profiles allowed.
- Effect: Narrows organization-visible trips, quotes, persons, aircraft, accounts, expenses, schedule, and org search in line with those assignments.
Contract Documents
Calendar/Schedule Default Views
Search Page Conversions
- Aircraft
- Trip
- Documents (this is a new page altogether to view/manage documents across the system)
Operations/Scheduling
Aircraft Event Account Selection
Contract Note Conditions
When you set up an operations note for an account, you can choose which contracts it applies to.
Trip alerts only show that note when one of those contracts is on the trip, so crews and dispatch see reminders at the right time.
Organization and people conditions are on their own section, separate from accounts and contracts, to make the note easier to set up.
Mission Type Configurations
Finally, pre/post flight defaults can be set for the mission type (domestic and international). When these fields have values, it will use these instead of the company defaults.
Monthly Calendar View
What it is
Month Calendar gives you a full month-at-a-glance grid so you can see how aircraft, crew, and trips line up across the calendar without scrolling day-by-day. It complements the existing Calendar menu (week-oriented trip views) with a layout built around whole weeks and clear day cells.
How to open it
From the main menu, choose Month Calendar.
Who can see it is controlled by your usual schedule permissions (for example flight legs and/or aircraft events and maintenance, depending on how your administrator configured access).
What you see
A standard month grid (Sunday–Saturday) with the selected month in focus.
Days that belong to the previous or next month appear in the grid for context but are visually de-emphasized so the current month stays easy to scan.
Today is highlighted so you can orient quickly.
Each day can show icons or markers for the activities that fall on that date—primary aircraft, secondary aircraft (when your filters include a second aircraft), crew, and trips—so you can spot density and conflicts at a glance.
Toolbar and controls
Previous / Next — move one month at a time.
Month and year — jump quickly via the date control (formatted as month and year).
Today — return to the current month.
Settings — open the schedule filter dialog so the month matches the same aircraft, crew, and trip scope you use elsewhere (your filter choices can be saved with your user settings where applicable).
Refresh — reload data for the month on demand.
Auto Refresh — when your environment supports scheduled calendar refresh, you can turn automatic refresh on or off from the toolbar so the board stays current during busy operations.
UTC / Local — switch whether times are interpreted in UTC or local time for the loaded month.
Layer toggles — show or hide Aircraft, Crew, and Trips (and primary vs secondary aircraft when relevant). At least one visible layer stays on so the grid is never empty by mistake.
Working with a day
Select an item on a day to open the familiar timeline experience for more detail and updates, then save as you already do on other schedule screens. The month view is for planning and awareness; deeper edits happen in that detail flow.
Tips
Use Settings to narrow aircraft or people before reviewing a busy month—the grid stays readable when the filter matches how you actually dispatch.
If something looks stale after schedule changes, use Refresh (or enable Auto Refresh when available) before comparing to other systems.
Related Aircraft/Crew Organization Effective Date On Calendar/Schedule
Passenger/Account Note Service Alerts
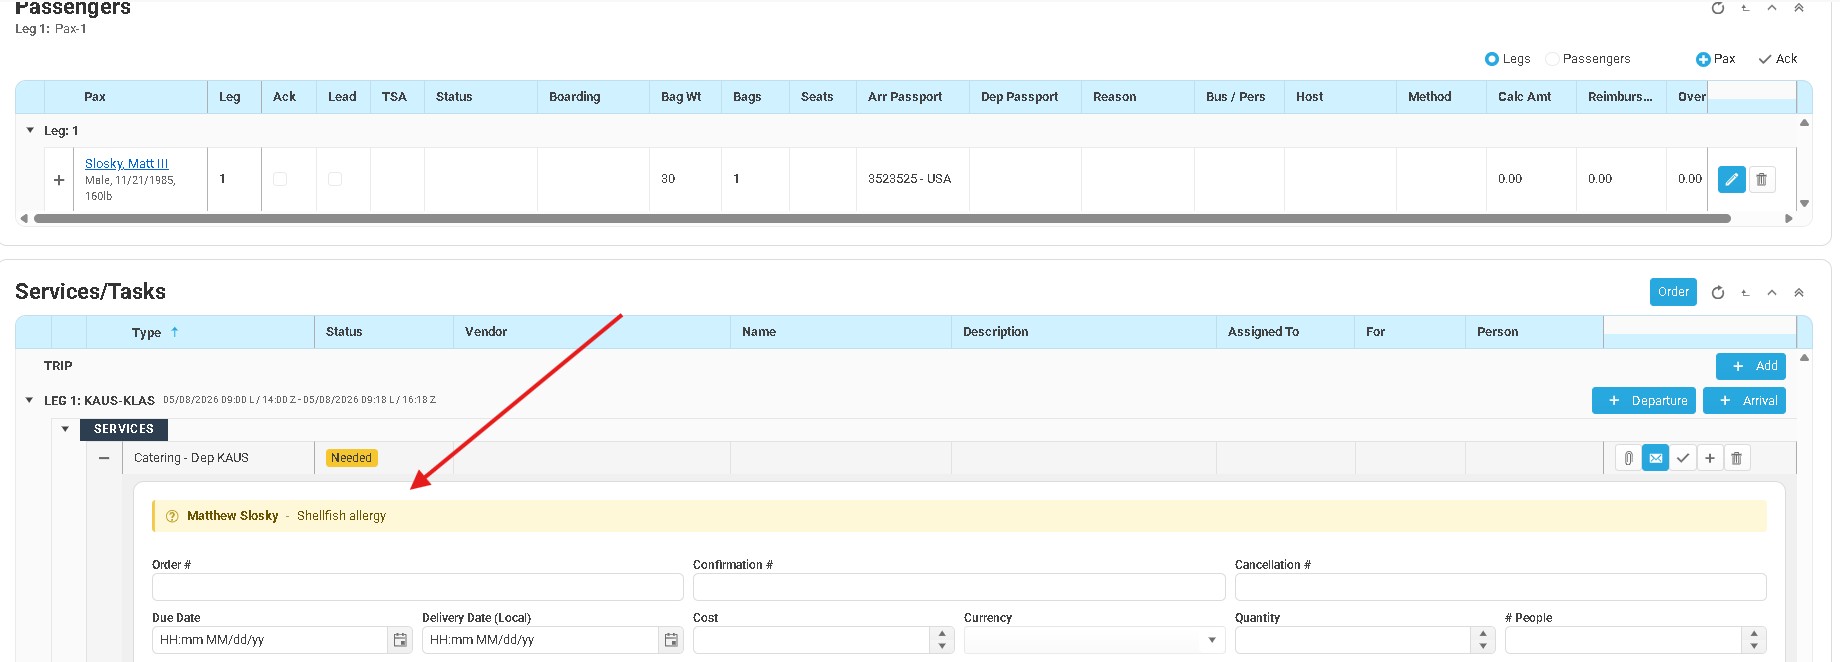
Teams and partners often need passenger and account context while they handle a service (for example catering and allergy information). This release surfaces the right notes inside the service when you expand it, so people see what matters without opening every profile first.
- When you expand a service on a flight or trip, matching passenger and account notes can appear at the top of that service section, before the rest of the details.
- Notes show who they apply to: passenger name for passenger notes, account name for account notes.
- The note's importance is easy to see at a glance (Information, Warning, Violation, or Stop), so crews and vendors can prioritize quickly.
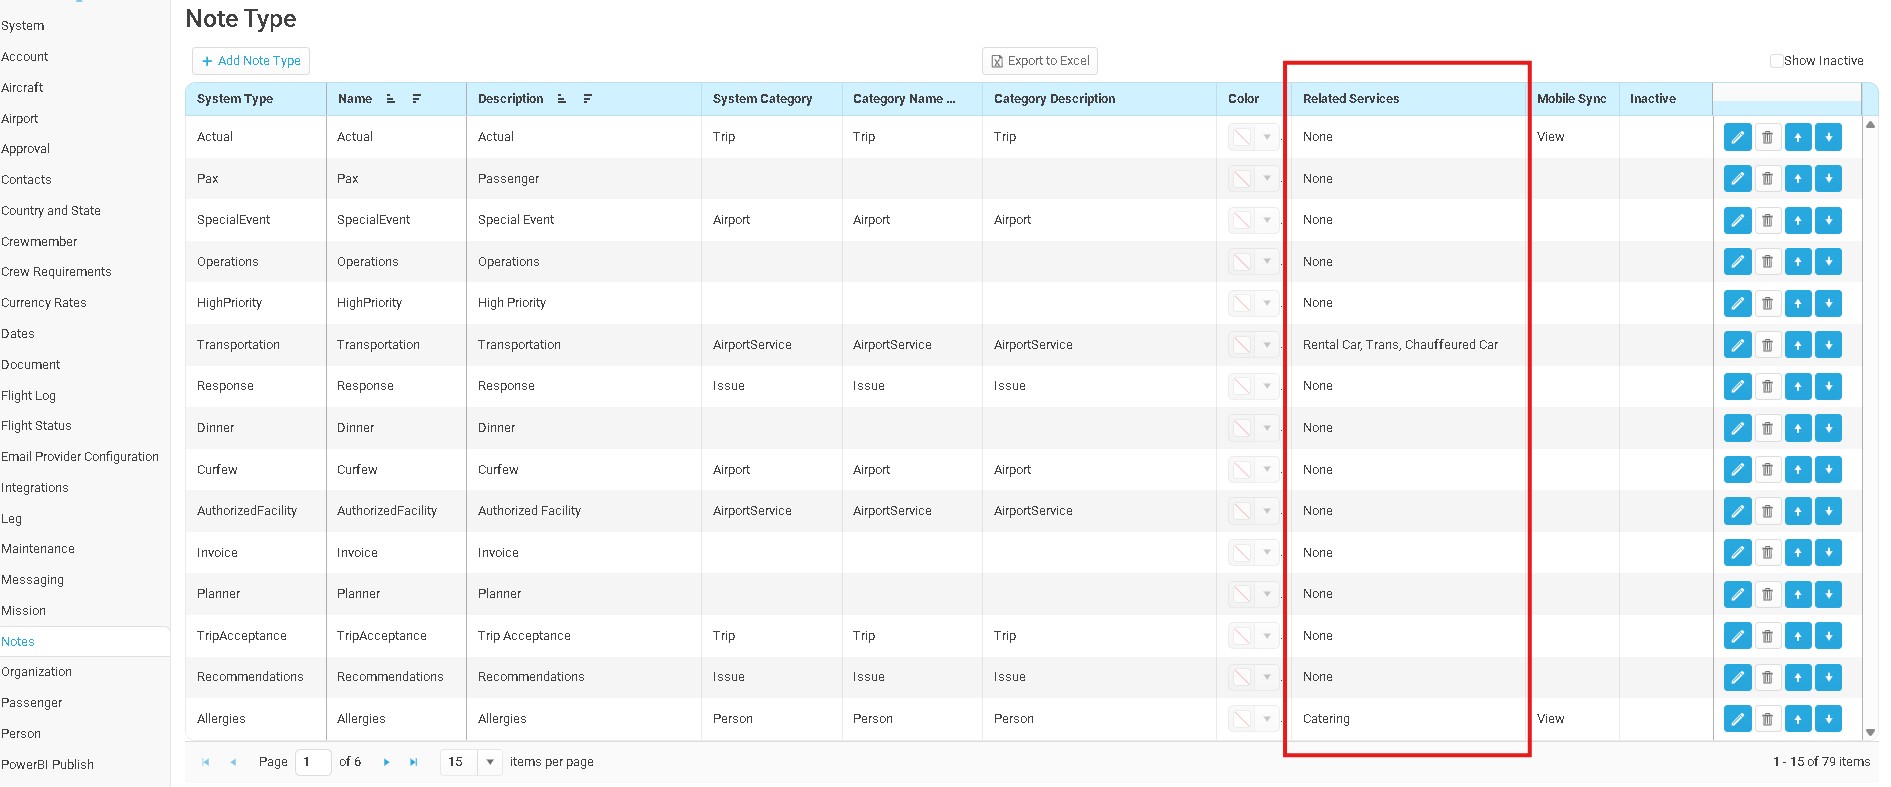
- In note type settings, there is a Related services option so you can link each note type to one or more service types it should go with (service types are the ones you already maintain for services on trips and legs).
- Only note types you link behave this way. If a note type has no related services, nothing changes for how those notes appear elsewhere.
Passport/Visa Display Updates
Summary
Passports and visas on a person's profile are reworked so visas stay visible and manageable on their own, instead of being buried as sub-records under a passport (which could hide them when a passport was inactive).
User-visible changes
Separate visas table — Visas are shown in their own table, not nested under each passport row.
Associate visa with a passport — Each visa has an associated passport you can set or change, so the link between visa and passport is explicit and editable.
Passport on the visa grid — The visa table includes a column for the linked passport number so users can see which passport a visa belongs to at a glance.
Expired passport indicator — If a visa is tied to an expired passport, that passport is called out with a red pill-style treatment (red background, white text) so it is obvious the passport is no longer valid.
Safer passport deletion — If a passport still has visas linked to it, deletion is blocked and the user sees: A visa is associated to this passport and it cannot be deleted.
Why it matters
Addresses cases where customers could not reliably see visas tied to passports, and where visas disappeared from view when the parent passport was marked inactive—by making visas first-class in the UI and tightening data rules around passport removal.
Service/Task Attachments
Trip Accounting Code
UTC/Local Time Entry
You can now choose whether your team enters trip and flight times in each airport's local time or in UTC. This preference applies when you build or edit itineraries and related flight timing, so everyone sees the same convention and labels match how they work.
Open System settings (under your organization's configuration).
In the Defaults section, find Edit Legs Time Zone (the setting that controls how leg times are entered).
Choose Local for airport local times at departure and arrival, or UTC for universal time. Local matches how Horizon worked before if you never changed anything. UTC helps teams that plan globally in one time standard.
If this setting has never been chosen, Horizon continues to treat times as airport local, so existing workflows stay the same until you opt in.
Trips — creating or editing the itinerary (departure date, ETD, arrival date, ETA) uses your choice, with clear labeling.
Flights — editing flight leg times follows the same rule.
Sync flight to leg — when aligning a flight with a leg, time entry follows the same preference.
Flight Time Estimator (main menu) — ETD and ETA inputs follow local or UTC with matching labels.
Some search and list screens (quotes, flights, trips, etc.) may also show or filter times in line with local vs UTC as that work rolls out; confirm what is included in your build with your release coordinator.
Operators who always think in local field time can keep that habit. Teams that standardize on UTC can enter and read times without mentally converting from airport time. One simple default keeps Horizon consistent across trip building, flights, and the time estimator.
Sales
Similar Quote Display
Related Articles
Web - 2026.3
Maintenance Flight Release Reset Based On Maintenance Event When a maintenance event is added to an aircraft, if there are any flights within the offline period that are already released, the system will automatically unrelease them. ...Web - July 2027 (Piper)
Web - Piper General Date and Time Display Improvements Horizon makes date and time information easier to understand across the web application, especially when teams work across airports, UTC, and homebase time. Hover over supported date/time fields ...Web - June 2026 v2
General AWS SES Email Provider Horizon adds AWS SES as an outbound email option for tenants that prefer not to connect Microsoft Graph or Gmail due to security or IT policy constraints. Portside sending with no DNS setup: Select AWS SES (Portside) ...Web - June 2026
API GET Airports New API endpoint to pull basic airport data by airport code (ICAO, IATA or FAA) GET Contract Usage New API endpoint to pull usage associated to a specific account contract by Contract Types, Contract Numbers, Contract IDs, Start ...Web - 2025.19
Crew Records Crew Requirement Search Page A dedicated search page for crew requirements is available to better manage upcoming or past requirements. The page is grouped by Due Date by default, but can be adjusted per user. The standard search ...